
Using APIs with Salesforce CMS
Connect to Salesforce
Note:
- Learn how to connect your Salesforce CRM to eTrusted: trigger events to eTrusted at your Salesforce touchpoints.
- Call the eTrusted Events API from within Salesforce using Apex code
You will need:
- A Salesforce system in an edition that features the Salesforce Process Builder: Salesforce Classic or Lightning Experience, as Essentials, Professional, Enterprise, Performance, Unlimited, or Developer edition
- API credentials to connect to the APIs.
Your organisation uses a Salesforce CRM system that you want to connect with your eTrusted account?
No problem!
It is reasonably easy to connect Salesforce and eTrusted via Salesforce's Apex programming language and classic REST API calls against the eTrusted API.
Follow the steps on this page for a baseline tutorial how to connect the two systems.
Import
You need two custom objects, an Apex trigger and some Apex code that works with custom objects.
There is a convenient way for creating all of that: Salesforce offers a migration function to partially dump and recreate an environment.
For that purpose we exported the required custom objects, the trigger and the code as a zip bundle for you to import.
Download and unzip our zip bundle.
It contains a README, a license note and the actual Salesforce migration bundle (again, a zip file).
Do the following:
- Log into the Salesforce workbench.
- From the migration tab, select Deploy.
- Select the migration bundle (
unmanagedPackage.zip). - Select "Rollback on Error" and pick "Run Specified Tests" for Test Level.
- Select
eTrusted_MetaHandler_Testas test class:
Finish the import.
Remote Site Settings
Next, add two eTrusted URLs to your remote site settings:
- Search Setup for Remote Site Settings and click it just below Security.
- Click New Remote Site
- Enter "eTrusted API" as Remote Site Name and
https://api.etrusted.comas Remote Site URL. - Click Save & New.
- Enter "eTrusted Login" as Remote Site Name and
https://login.etrusted.comas Remote Site URL. - Click Save.
Credentials
It is handy to store your eTrusted credentials in Salesforce so that you can reuse them for your API calls.
It is crucial to protect your credentials - and Salesforce offers a convenient way to do that: Custom Metadata Types.
In the Salesforce web interface, do the following:
- Search Setup for Custom Metadata Types and click it just below Custom Code.

- Again on the All Custom Metadata Types page, click Manage Records next to your Custom Metadata Type "eTrusted Credential".
- On the eTrusted Credentials page, click New just above the list.
- Fill in the records, using the following information:
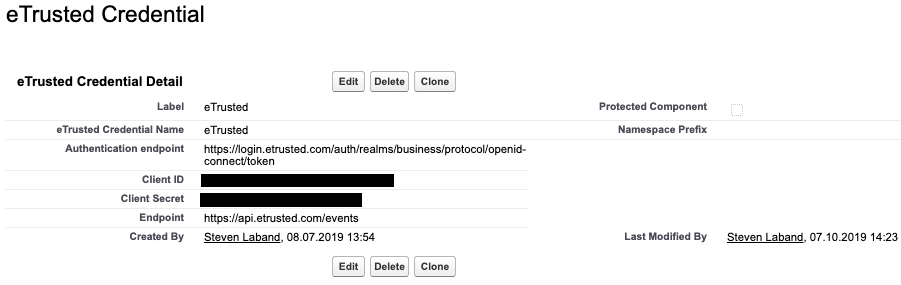
where Client ID and Client Secret are your eTrusted credentials. - Click Save & New.
- Fill in the records again, using the following information:
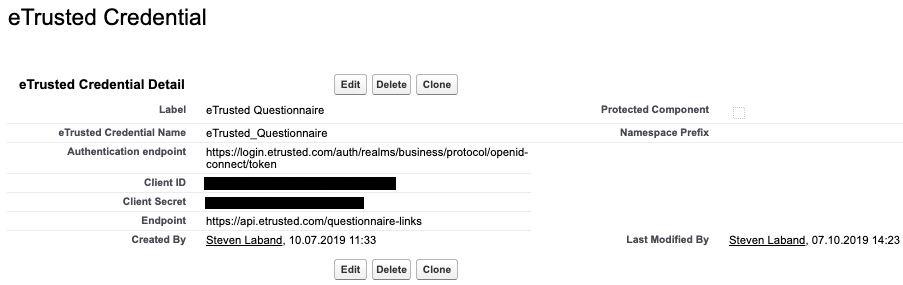
where Client ID and Client Secret are your eTrusted credentials.
See Define a custom metadata type declaratively for reference.
Permissions and Visibilities
Set permissions and visibilities according to your Salesforce profiles and roles.
- Back in your regular Salesforce web app, search Setup for Tabs.
- In Custom Tabs, click New.
- Select "eTrusted Callout" as Object and a Tab Style that you like.
- Click Next two times.
Select profile visibilities and Custom App settings to your liking. - Click Save.
- In Custom Tabs, again click New and do the same for "eTrusted MetaData".
- In Setup, click the Object Manager tab.
- Scroll down and click "eTrusted Callout".
- In Fields & Relationships, do the following for every record:
- Click the record.
- On the record page, click Set Field-Level Security
- Select the Field-Level Security profiles that you want.
- Repeat the last steps for "eTrusted MetaData".
- In Setup, select Profiles from the Users dropdown menu.
- Click Edit for the profile you want to grant access to the custom objects, e.g. "System Administrator".
- Scroll down to Custom Object Permissions, and find "eTrusted Callouts" and "eTrusted MetaData".
- Check the Modify All box for both.
- Back in the Profiles page, click the profile (instead of Edit, this time).
- Scroll down to Custom Record Type Settings and click Edit in the "eTrusted Callouts" row.
- Select both Available Record Types.
eTrusted Callout Record
Create a record for eTrusted Callout:
-
Click the App Launcher.
-
Search eTrusted Callouts and click it under All elements.
-
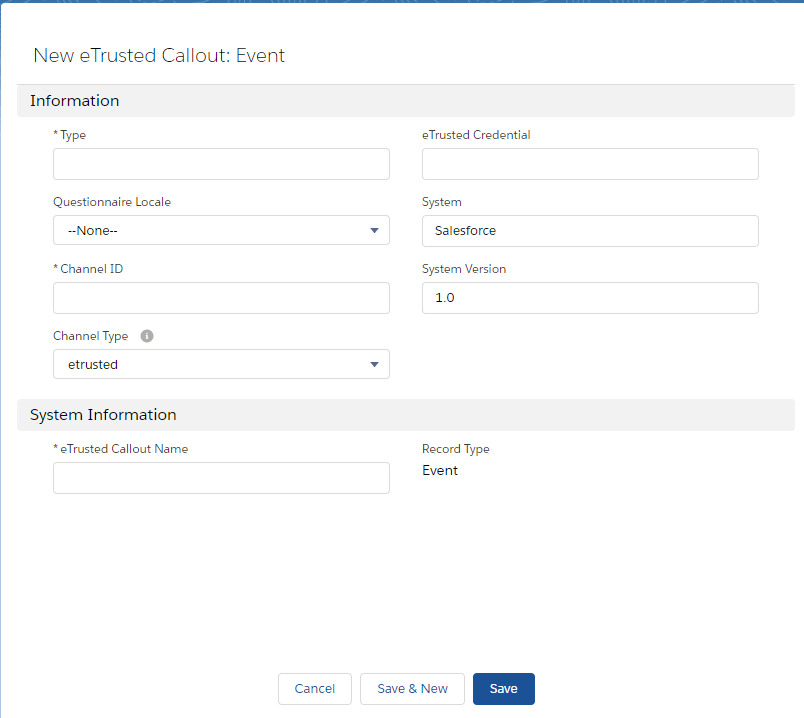
Click New and create a new entry for "eTrusted Callout".
-
Select Event as the record type and create the record like this and Save.
-
For eTrusted Credential, set the name from your "Custom Metadata Types" in your eTrusted Credentials under "Manage Records"
-
Do the same for Questionnaire as record type like this:
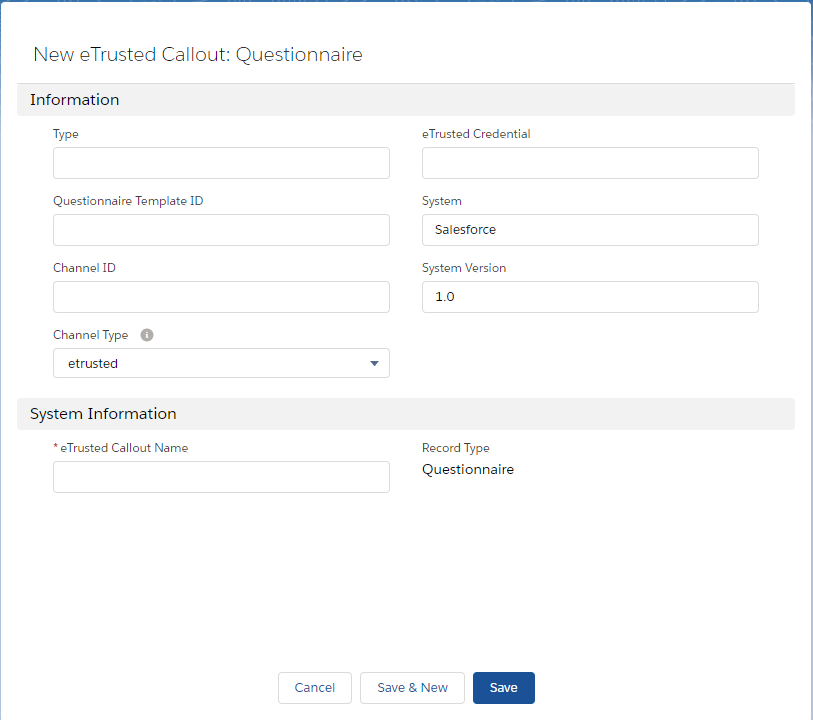
_ The event type should be the event type or touchpoint in your \_eTrusted_ configuration, e.g. `checkout`.
_ If you send a questionnaire via the Events API, provide the `Questionnaire Locale`.
_ If you request a questionnaire link from _eTrusted_, provide the `Questionnaire Template ID`.
_ Provide channel data as defined in your \_eTrusted_ configuration, both for channel ID and channel type.
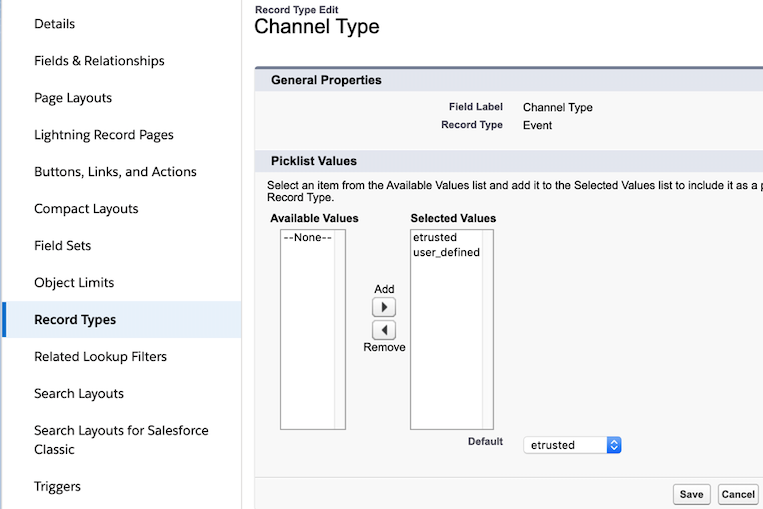
Allowed Values for Record Types
Set allowed values for your record types:
- In Setup, click the Object Manager tab again.
- Scroll down and click "eTrusted Callout".
- In Record Types, for each record:
- Click the record type.
- In Picklist Available for Editing, click Edit and select all Available Values for every picklist.
For example, for the channel record type, set "etrusted" and "user_defined" as allowed values like this:
Process Builder
Finally, you need to regulate when your Apex code will be executed.
For that, we recommend using the Salesforce Process Builder.
In the following steps, you will create a trigger for your Apex code:
Every time your Salesforce CRM creates a custom object (see above), it will be executed, handle the necessary metadata and call the eTrusted Events API.
- In Setup, search Process Builder in the
Quick Findbox. - Click New.
- For your Process Name, type
eTrusted. - For The process starts when, select "A record changes".
- Click Save.
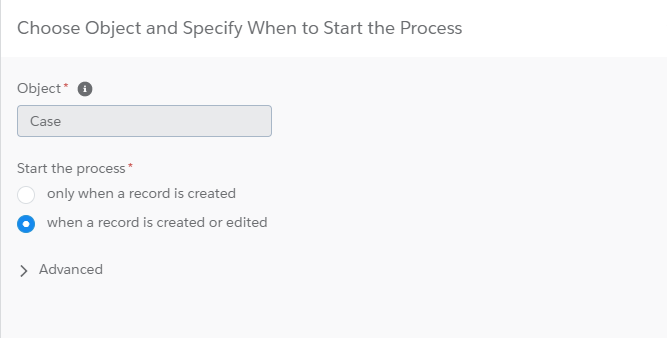
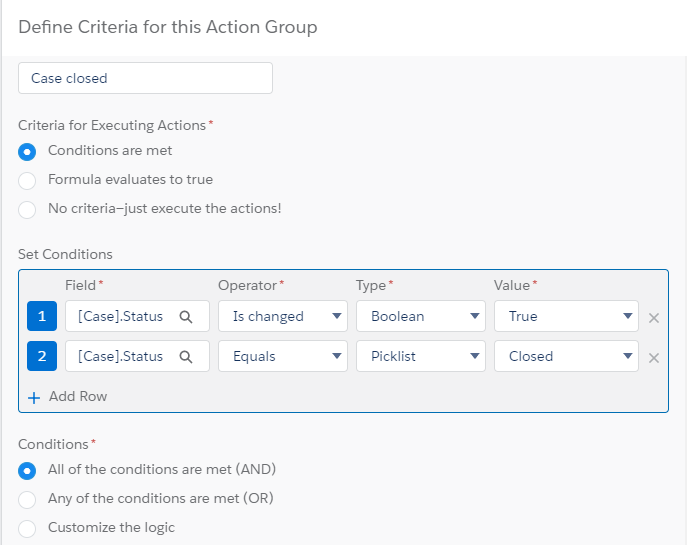
- Configure the start condition like this:
- Configure the criteria like this:
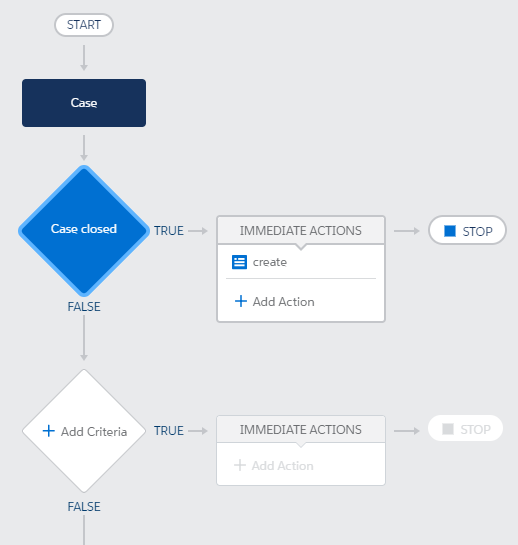
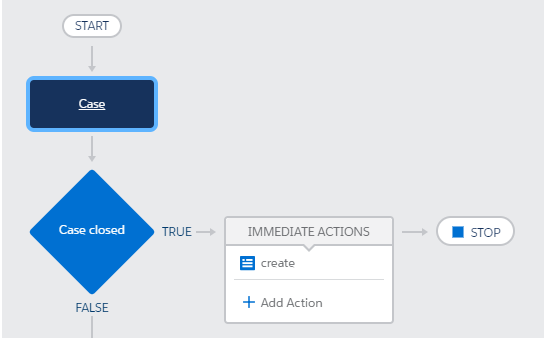
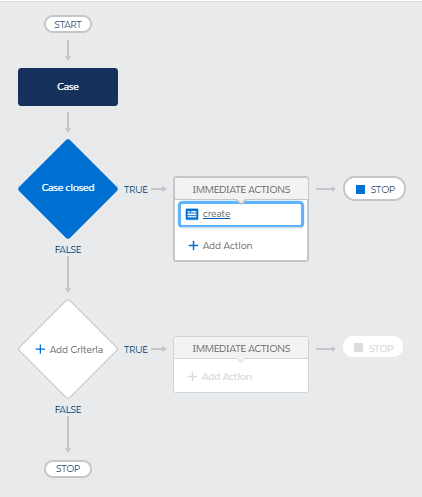
- Configure the immediate actions like this:
- Click Activate to activate your process.
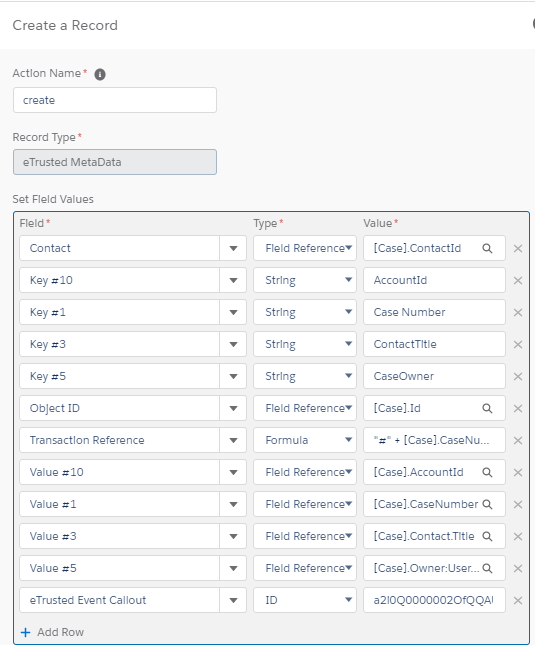
_ Make sure that the transactional reference is unique.
  If you want to send several events for the same case, you can do so via time stamp, for example:
  `"#" + [Case].CaseNumber + ":" + [Case].Subject + "-" +Text(NOW())`.
_ You also need to specify the object ID.
  It is the record ID where the event is triggered (in our case, it is the case ID).
_ The order of **Keys** and **Values** is irrelevant, however, it is important that "value 1" has indeed the value of "key 1" and so on.
  **Key**-**Value** pairs are the actual `metadata` used in \_eTrusted_.
  Keys can be picked to your liking.
_ If you are requesting a questionnaire link from \_eTrusted_, set the field "Questionnaire Link OutputField" with the API name of the field where you want to save the Questionnaire Link.
  The field must be within the same object where the event is triggered (in this case, "case").
\* The eTrusted Event Callout must be set.
  It is the "eTrusted Callout" ID that we created previously.
  It is part of your browser address between `/eTrusted_Callout__c/` und `/view` (18 characters long).
See Salesforce's quick guide on creating a new process with the Process Builder for reference.
Updated almost 3 years ago