
Lightspeed
1 General information
In this manual we will show you how to integrate the Trusted Shops technology into Lightspeed.
2. How to integrate without plugin
2.1 How to integrate the JavaScript of the Trustbadge
- Open your Lightspeed backend for the relevant domain where you need to integrate Trusted Shops
- Navigate to: Settings → Web Extras → Custom JS
- Insert the following script-tag and make sure to include your personal TSID (YOUR-TSid):
<!-- Trusted Shops - Trustbadge - Start  -->
<script async
data-desktop-y-offset="0"
data-mobile-y-offset="0"
data-desktop-disable-reviews="false"
data-desktop-enable-custom="false"
data-desktop-position="right"
data-desktop-custom-opening-direction="topright"
data-desktop-custom-width="150"
data-desktop-enable-fadeout="false"
data-disable-mobile="false"
data-disable-trustbadge="false"
data-mobile-custom-width="150"
data-mobile-custom-opening-direction="topright"
data-mobile-disable-reviews="false"
data-mobile-enable-custom="false"
data-mobile-position="left"
data-mobile-enable-topbar="false"
data-color-scheme="light"
charset="UTF-8"
src="//widgets.trustedshops.com/js/YOUR-TSid.js">
</script>
<!-- Trusted Shops - Trustbadge - END -->
- Make sure to set the Status to “active”
- Click “Save”
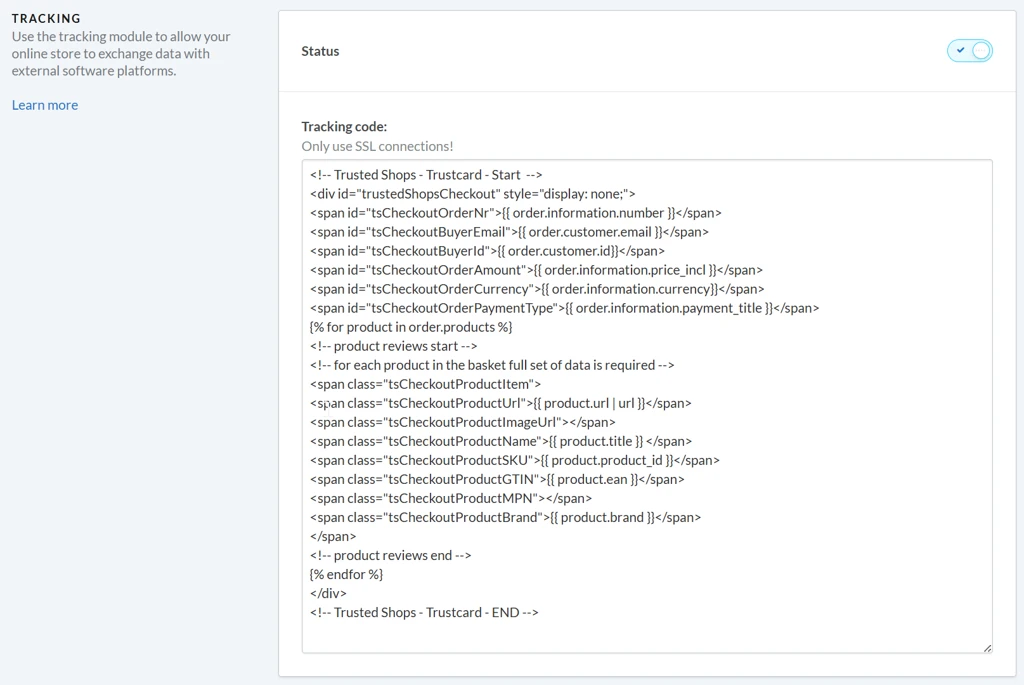
2.2 Defining data transfer for the Trustcard
- Open your Lightspeed backend for the relevant domain where you need to integrate Trusted Shops
- Navigate to: Settings → Web Extras → Tracking
- Insert the following Trustcard code:
Trustcard code
<div id="trustedShopsCheckout" style="display: none;">
<span id="tsCheckoutOrderNr">{{ order.information.number }}</span>
<span id="tsCheckoutBuyerEmail">{{ order.customer.email }}</span>
<span id="tsCheckoutBuyerId">{{ order.customer.id}}</span>
<span id="tsCheckoutOrderAmount">{{ order.information.price_incl }}</span>
<span id="tsCheckoutOrderCurrency">{{ order.information.currency}}</span>
<span id="tsCheckoutOrderPaymentType">{{ order.information.payment_title }}</span>
{% for product in order.products %}
<!-- product reviews start -->
<!-- for each product in the basket full set of data is required -->
<span class="tsCheckoutProductItem">
<span class="tsCheckoutProductUrl">{{ product.url | url }}</span>
<span class="tsCheckoutProductImageUrl"></span>
<span class="tsCheckoutProductName">{{ product.title }} </span>
<span class="tsCheckoutProductSKU">{{ product.product_id }}</span>
<span class="tsCheckoutProductGTIN">{{ product.ean }}</span>
<span class="tsCheckoutProductMPN"></span>
<span class="tsCheckoutProductBrand">{{ product.brand }}</span>
</span>
<!-- product reviews end -->
{% endfor %}
</div>
<!-- Trusted Shops - Trustcard - END -->
- Make sure to set the Status to “active”
- Click “Save”
(The Trustcard code above is using the variable for the Lightspeed Internal ID as identifier for the products, this is because the value SKU is not mandatory in Lightspeed)
This is how it looks integrated (Screenshot):
3 How to integrate widgets
Widgets are used to display reviews and stars in your shop frontend.
Each widget has its own widget ID. You can find your Widget's ID in your eTrusted Control Center under:
Reviews → Marketing → Widgets
You can see here how the widgets look like in your shop after the integration is done:
How do widgets look like on my website?
3.1 How to integrate the eTrusted bootstrap tag in the head section of your shop
The eTrusted bootstrap tag is used to load the JavaScript code needed to handle all the eTrusted Widgets in your shop.
- Open your Lightspeed backend for the relevant domain where you need to integrate Trusted Shops
- Navigate to: Settings → Web Extras → Custom Head Code
Paste the following url into the External script URL section:
eTrusted bootstrap tag
https://integrations.etrusted.com/applications/widget.js/v2
This is how it looks integrated (Screenshot):

3.2 Review Carousel / Trusted Stars widget embedding (Service Reviews)
It is not possible to add any code in Lightspeed through the “Theme Editor”. This needs to be done in the relevant theme file where the widget needs to be shown. These files can be found in the relevant Lightspeed backend.
- Navigate to: Design → Advanced → Edit code
This will open the overview of the different files that are in use by the theme. To make sure that you are using the correct files, please reach out to responsible party of the theme or who is responsible for the maintenance/ design of the site.
It is best practice to make use of “snippets” in Lightspeed, instead of placing the code directly in the theme files.
- Create a new snippet and give this a relevant name (e.g. “eTrusted_ReviewCarousel”/ eTrusted_TrustedStars”
- This will open a new snippet where you need to paste the following widget code (Make sure that you provide your personal WIDGET ID):
eTrusted Widget Code
<!-- Begin eTrusted widget tag -->
<etrusted-widget data-etrusted-widget-id="YOUR-WIDGET-ID"></etrusted-widget>
<!-- End eTrusted widget tag -->
- Navigate to the relevant file where the widget needs to be placed and find the exact location in the file where the widget needs to be shown
- When the location is found, place the snippet through the code below:
{% include 'snippets/eTrusted_ReviewCarousel.rain' %}
(Make sure that you use the same naming that is in use for the newly created snippet)
3.3 Product review widgets embedding
3.3.1 Full Review List/ Mini Stars widget embedding (on product page)
It is not possible to add any code in Lightspeed through the “Theme Editor”. This needs to be done in the relevant theme file where the widget needs to be shown. These files can be found in the relevant Lightspeed backend.
- Navigate to: Design → Advanced → Edit code
This will open the overview of the different files that are in use by the theme. To make sure that you are using the correct files, please reach out to responsible party of the theme or who is responsible for the maintenance/ design of the site.
It is best practice to make use of “snippets” in Lightspeed, instead of placing the code directly in the theme files.
- Create a new snippet and give this a relevant name (e.g. “eTrusted_MiniStars”/ eTrusted_FullReviewList” )
- This will open a new snippet where you need to paste the following widget code (Make sure that you provide your personal WIDGET ID!):
eTrusted Widget code (Embed Widget)
<!-- Begin eTrusted widget tag -->
<etrusted-widget data-etrusted-widget-id="YOUR-WIDGET-ID" data-sku="{{ product.id }}></etrusted-widget>
<!-- End eTrusted widget tag -->
- Navigate to the relevant file where the widget needs to be placed and find the exact location in the file where the widget needs to be shown
- When the location is found, place the snippet through the code below and:
{% include 'snippets/eTrusted_MiniStars.rain' %}
(Make sure that you use the same naming that is in use for the newly created snippet)
3.3.2 Product Review Mini Stars widget embedding (Widget extensions) on product page
The Full Review List widget has additional extensions that you can use to display the product review stars.
With the following code, you can include Review stars that links to the main widget anywhere on the product page (must be on the same page). For example, you can jump from a short rating next to the product directly to a detailed description further down on your product page.
It is not possible to add any code in Lightspeed through the “Theme Editor” and this needs to be done in the relevant theme file where the widget needs to be shown. These files can be found in the relevant Lightspeed backend.
- Navigate to: Design → Advanced → Edit code
This will open the overview of the different files that are in use by the theme. To make sure that you are using the correct files, please reach out to responsible party of the theme or who is responsible for the maintenance/ design of the site.
It is best practice to make use of “snippets” in Lightspeed, instead of placing the code directly in the theme files.
- Create a new snippet and give this a relevant name (e.g. “eTrusted_WidgetExtension”)
- This will open a new snippet where you need to paste the following widget code (Make sure that you provide your personal WIDGET ID!):
eTrusted Widget Code (Widget Extension)
<!-- Begin eTrusted product-star tag -->
<etrusted-product-review-list-widget-product-star-extension></etrusted-product-review-list-widget-product-star-extension>
<!-- End eTrusted product-star tag -->
- Navigate to the relevant file where the widget needs to be placed and find the exact location in the file where the widget needs to be shown
- When the location is found, place the snippet through the code below:
{% include 'snippets/eTrusted_WidgetExtension.rain' %}
(Make sure that you use the same naming that is in use for the newly created snippet)
3.4 Product Review Full Review List/ Mini Stars widget embedding (on category page)
It is not possible to add any code in Lightspeed through the “Theme Editor”. This needs to be done in the relevant theme file where the widget needs to be shown. These files can be found in the relevant Lightspeed backend.
- Navigate to: Design → Advanced → Edit code
This will open the overview of the different files that are in use by the theme. To make sure that you are using the correct files, please reach out to responsible party of the theme or who is responsible for the maintenance/ design of the site.
It is best practice to make use of “snippets” in Lightspeed, instead of placing the code directly in the theme files.
- Create a new snippet and give this a relevant name (e.g. “eTrusted_MiniStars”/ eTrusted_FullReviewList” )
- This will open a new snippet where you need to paste the following widget code (Make sure that you provide your personal WIDGET ID!):
eTrusted Widget code (Embed Widget)
<!-- Begin eTrusted widget tag -->
<etrusted-widget data-etrusted-widget-id="YOUR-WIDGET-ID" data-sku="{{ product.id }}></etrusted-widget>
<!-- End eTrusted widget tag -->
- Navigate to the relevant file where the widget needs to be placed and find the exact location in the file where the widget needs to be shown
- When the location is found, place the snippet through the code below:
{% include 'snippets/eTrusted_MiniStars.rain' %}
(Make sure that you use the same naming that is in use for the newly created snippet)
Updated 3 months ago