
Shopify
1 General information
In this manual we will show you how to integrate the Trusted Shops widgets into Shopify.
2 How to integrate widgets
Widgets are used to display reviews and stars in your shop frontend.
Each widget has its own widget ID. You can find your widget's ID in your eTrusted Control Center under:
Reviews → Marketing → Widgets
You can see here how the widgets look like in your shop after the integration is done:
How do widgets look like on my website?
2.1 How to integrate the eTrusted bootstrap tag in the head section of your shop
The eTrusted bootstrap tag is used to load the JavaScript code needed to handle all the eTrusted widgets in your shop.
- Open your Shopify backend
- Navigate to: 1: Sales Channels → 2: Online Store → 3: Edit code (in active theme)

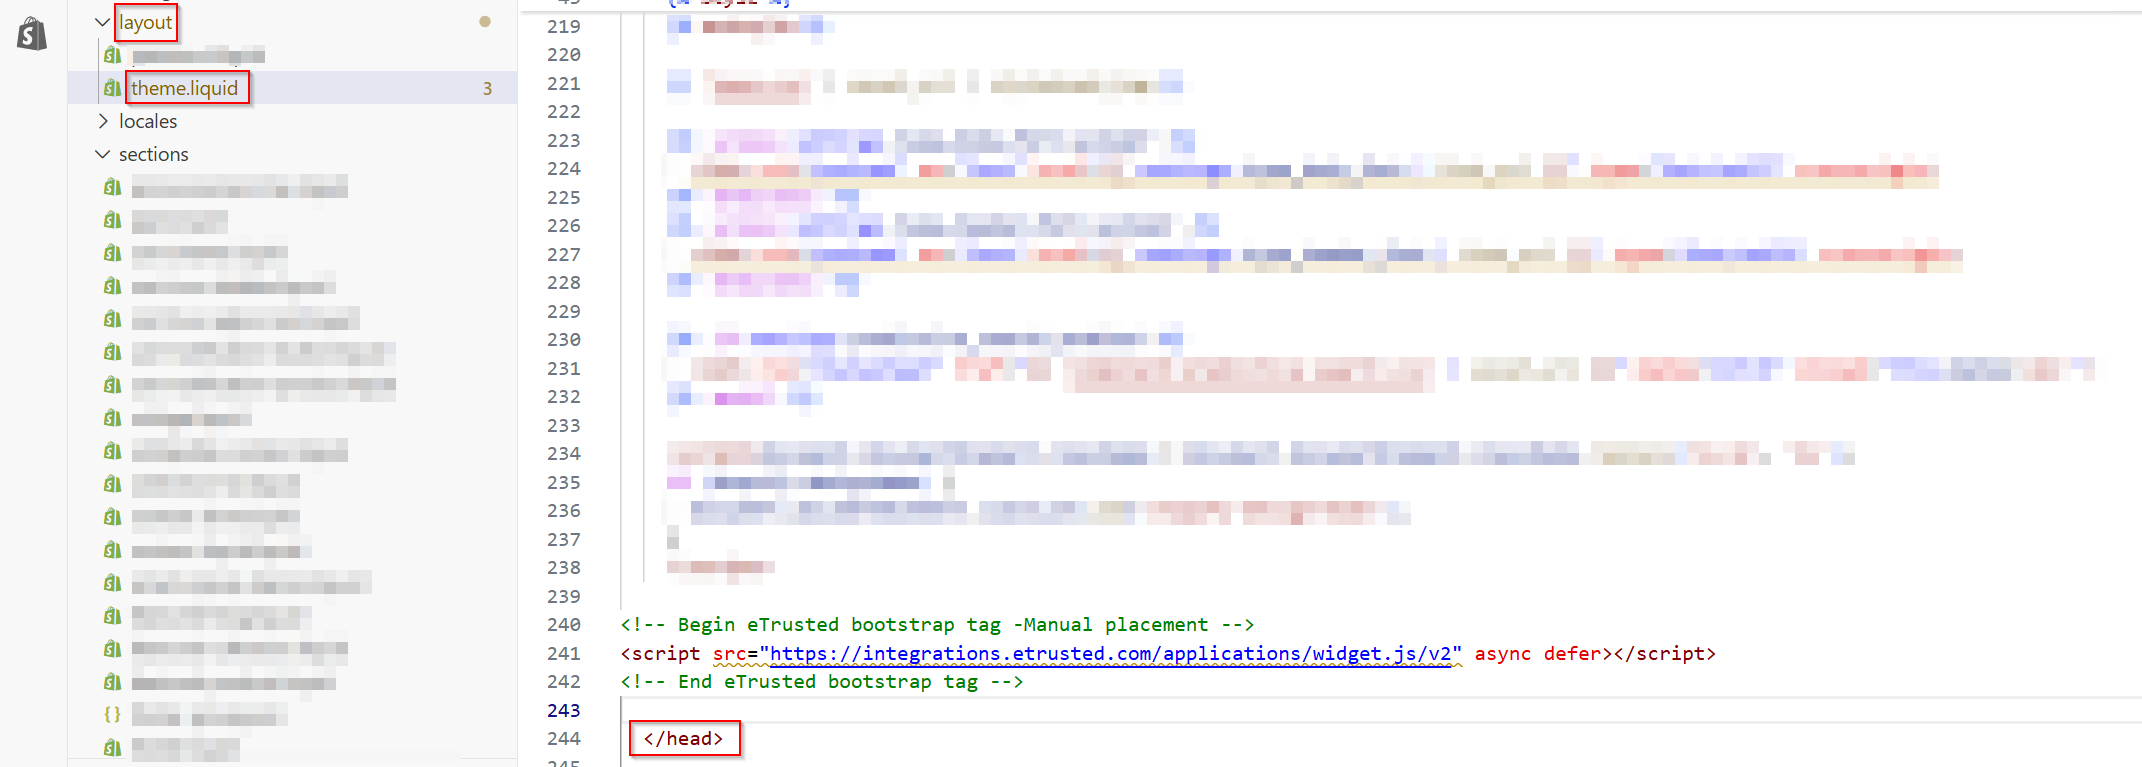
Navigate to: Layout → theme.liquid
and look for the closing tag and paste the code below:
<!-- Begin eTrusted bootstrap tag - Manual placement -->
<script src="https://integrations.etrusted.com/applications/widget.js/v2" async defer></script>
<!-- End eTrusted bootstrap tag -->
directly above the closing tag .
This is how it looks integrated:
2.2 Integrating the Review Carousel / Trusted Stars widget (Service Reviews)
There are two ways of adding custom code in Shopify.
- By adding a new Custom Liquid section in the Theme editor (This is not supported by every theme in Shopify - If not supported, please add the code directly in the relevant file) and add the widget code there
- By adding the widget code directly into the relevant file in the theme where the widget needs to be shown
2.2.1 Integrating the Review Carousel / Trusted Stars widget (Service Reviews) - in Theme Editor
To obtain your personal widget code, follow the steps described below:
- Open your Trusted Shops Control Centre and select the desired Channel/ domain:
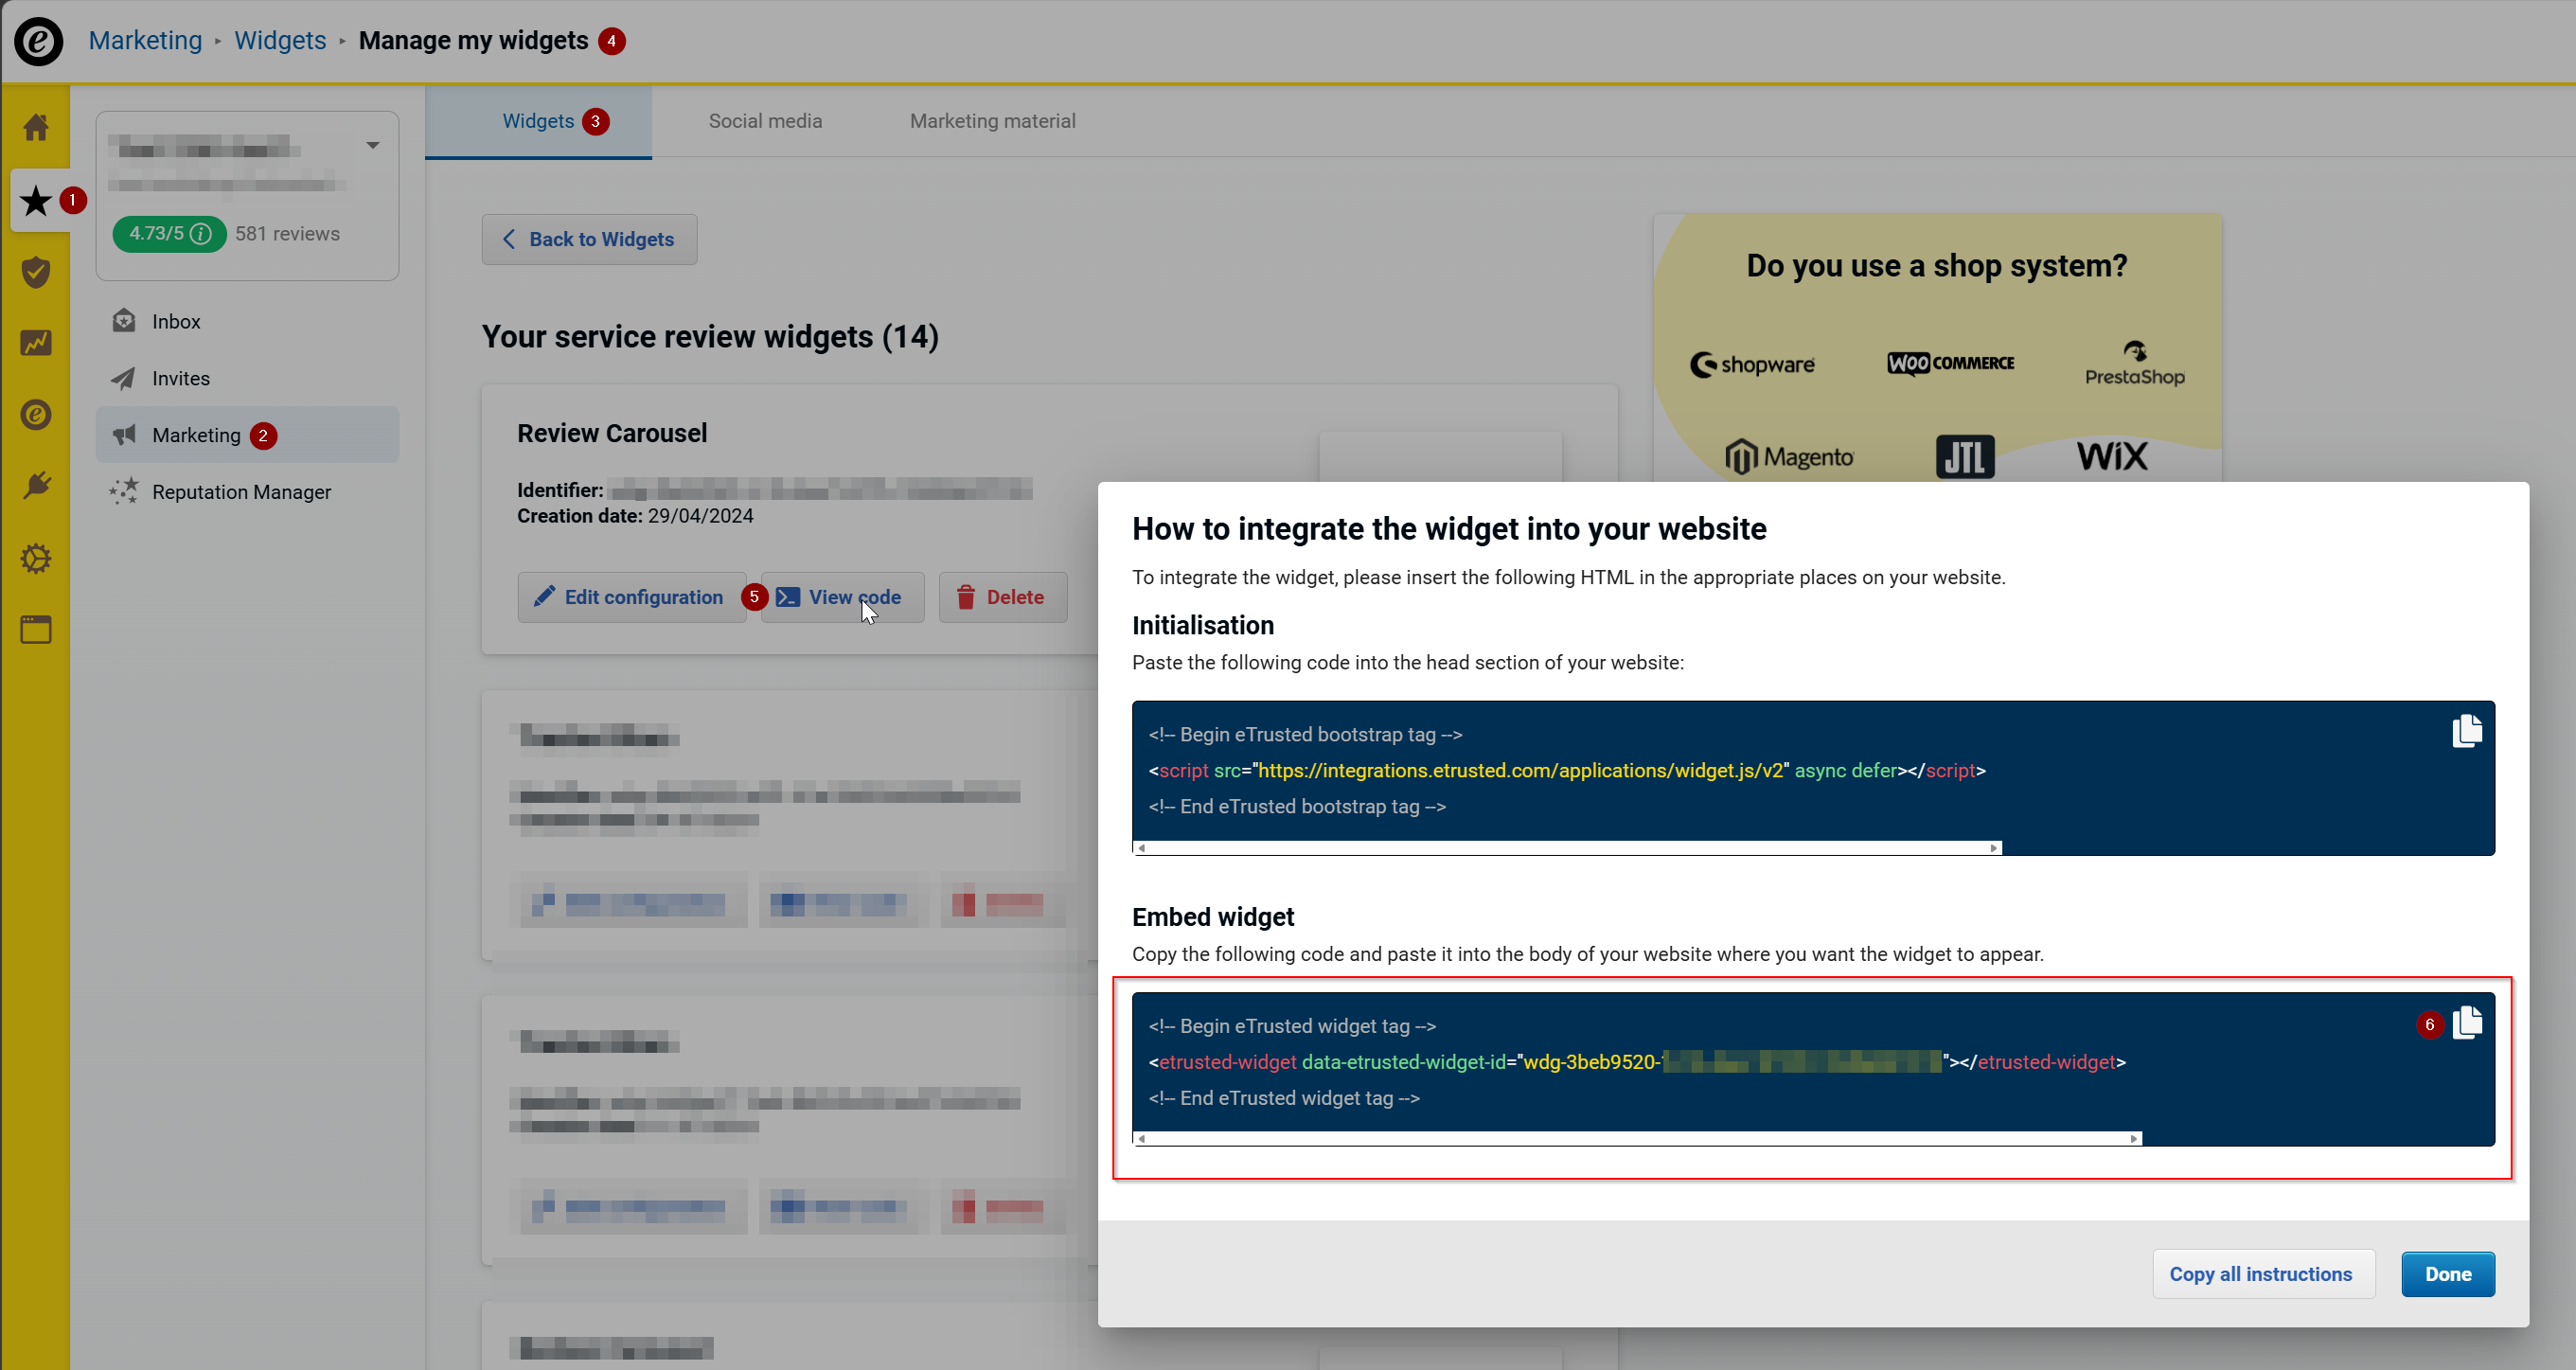
- Navigate to: 1: Reviews → 2: Marketing → 3: Widgets → 4: Manage my widgets
- Select the widget that you want to add to your page and click 5: View code
- 6: Copy the widget code with the correct widget ID
- Open your Shopify backend and navigate to: 1: Sales Channels → 2: Online Store → 3: Edit Theme (in the active theme)

This will open the theme editor. Then go to the desired location where the widget should be placed.
- Create a new Custom Liquid section at the desired location of the widget
- Paste the earlier copied widget code in the Custom Liquid textbox and click Save
Now the widget should be showing on your page.
2.2.2 Integrating the Review Carousel / Trusted Stars widget (Service Reviews) - in Theme File
To obtain your personal widget code, follow the steps described below:
- Open your Trusted Shops Control Centre and select the desired Channel/domain:
- Navigate to: 1: Reviews → 2: Marketing → 3: Widgets → 4: Manage my widgets
- Select the widget that you want to add to your page and click 5: View code
- 6: Copy the widget code with the correct widget ID
- Open your Shopify backend and navigate to: 1: Sales Channels → 2: Online Store → 3: Edit code (in active theme)

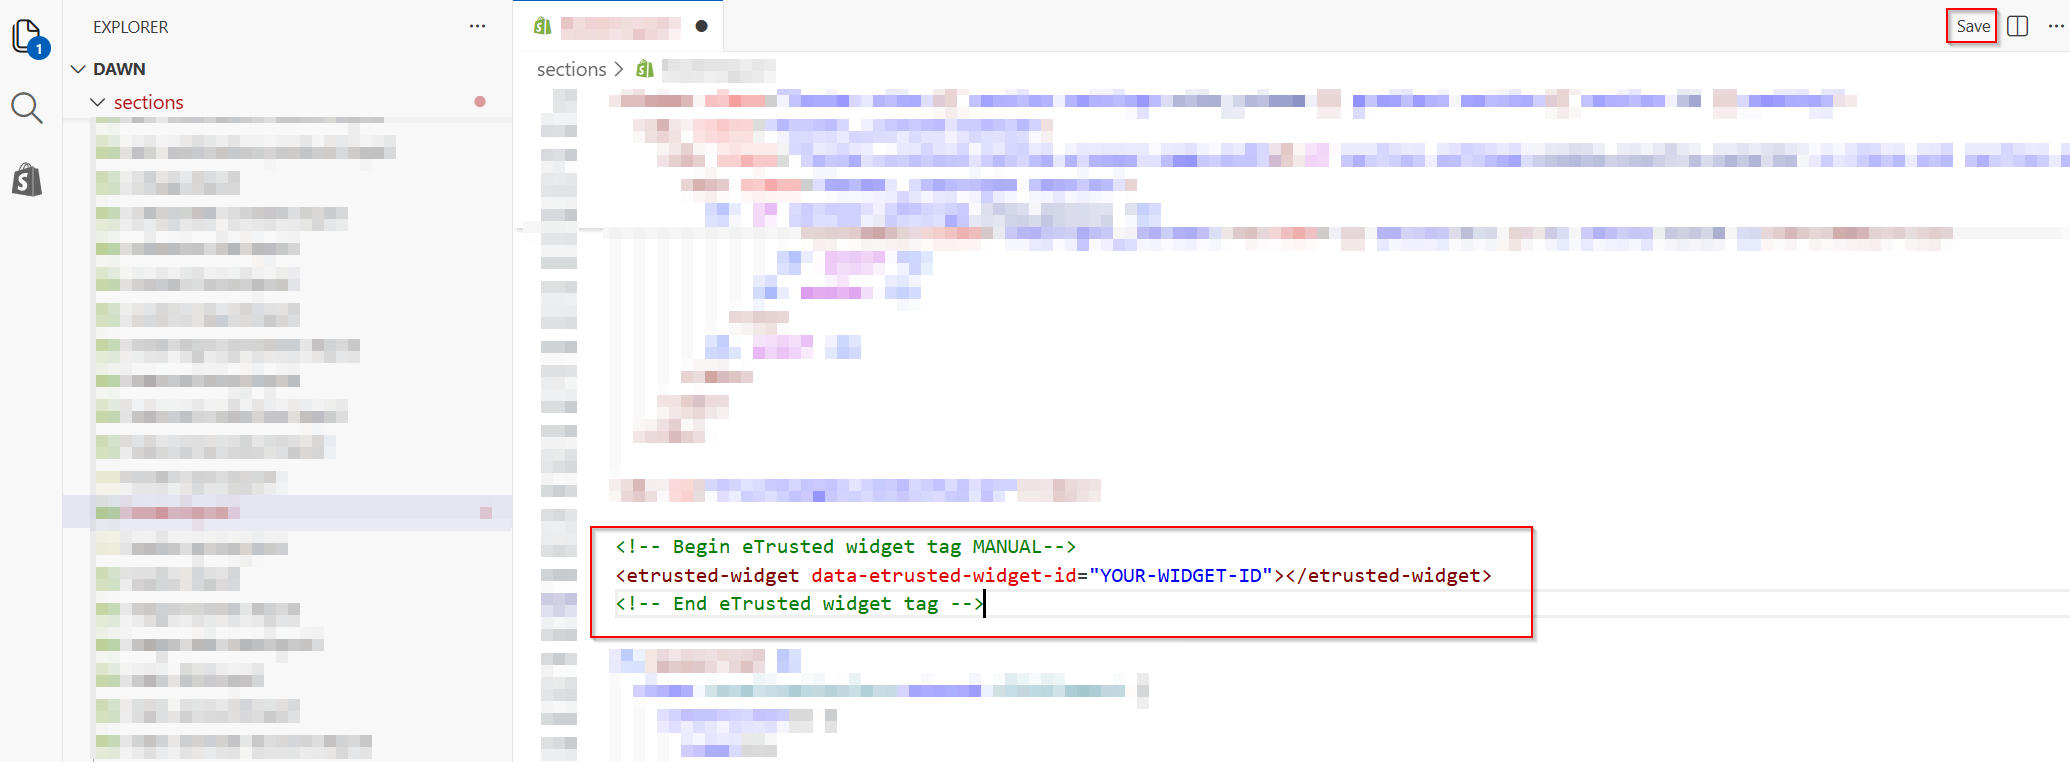
- Look for the relevant file, and the specific location in the file, where the widget needs to be shown (Make sure to find the correct file and location that represents the desired location. In case of doubt, reach out to your developer or the creator of the theme)
- And paste the earlier copied widget code at the desired location in the relevant file and location of your theme and click Save
Now the widget should be showing on your page.
2.3 Integrating the Product review widgets
The following widget for the display of product reviews will be using the variant/child SKU's as identifier. If an SKU is not available for a product it will fall back to a product ID for that specific product. Duplicate SKU values will be filtered out from the list.
This widget code can be placed on the Product Detail Pages (PDP) as well as on the Category pages.
2.3.1 Integrating the Full Review List/ Mini Stars widget
2.3.1.1 Integrating the Full Review List/ Mini Stars widget - in Theme Editor
- Open your Shopify backend
- Navigate to: 1: Sales Channels → 2: Online Store → 3: Edit Theme (in active theme)
This will open the theme editor and look for the desired location of the widget.
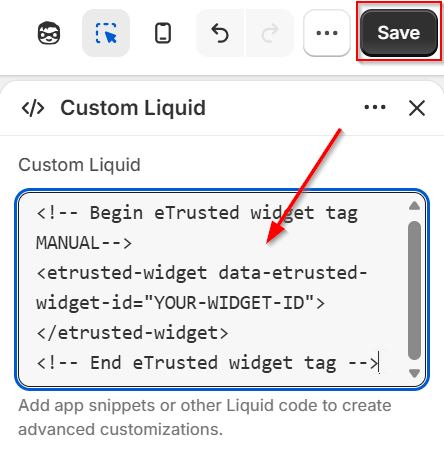
- Create a new Custom Liquid section at the desired location of the widget
- Copy the following eTrusted widget code below (Make sure that you provide your personal YOUR_WIDGET_ID): Each widget has its own widget ID. You can find your widget's ID in your eTrusted Control Center under:
Reviews → Marketing → Widgets
eTrusted Widget Code
<!-- Begin eTrusted widget integration MANUAL -->
{% assign ts_widget_product = blank %}
{% if card_product != blank and card_product.variants != blank %}
  {% assign ts_widget_product = card_product %}
{% elsif product_card_product != blank and product_card_product.variants != blank %}
  {% assign ts_widget_product = product_card_product %}
{% elsif product != blank and product.variants != blank %}
  {% assign ts_widget_product = product %}
{% elsif current_variant != blank and current_variant.product != blank and current_variant.product.variants != blank %}
  {% assign ts_widget_product = current_variant.product %}
{% elsif product_variant != blank and product_variant.product != blank and product_variant.product.variants != blank %}
  {% assign ts_widget_product = product_variant.product %}
{% endif %}
{% assign ts_product_identifiers = '' %}
{% assign ts_seen_identifiers = '|' %}
{% if ts_widget_product != blank %}
  {% for variant in ts_widget_product.variants %}
    {% assign ts_variant_identifier = variant.sku | strip %}
    {% if ts_variant_identifier == blank %}
      {% assign ts_variant_identifier = variant.id %}
    {% endif %}
    {% capture ts_seen_token %}|{{ ts_variant_identifier }}|{% endcapture %}
    {% unless ts_seen_identifiers contains ts_seen_token %}
      {% capture ts_seen_identifiers %}{{ ts_seen_identifiers }}{{ ts_variant_identifier }}|{% endcapture %}
      {% if ts_product_identifiers != blank %}
        {% capture ts_product_identifiers %}{{ ts_product_identifiers }},{{ ts_variant_identifier }}{% endcapture %}
      {% else %}
        {% assign ts_product_identifiers = ts_variant_identifier %}
      {% endif %}
    {% endunless %}
  {% endfor %}
{% endif %}
<etrusted-widget data-etrusted-widget-id="YOUR_WIDGET_ID" data-sku="{{ ts_product_identifiers }}"></etrusted-widget>
<!-- End eTrusted widget integration -->
- And paste this code in the Custom Liquid textbox and click Save
Now the widget should be showing on your page.
2.3.1.2 Integrating the Full Review List/ Mini Stars widget - in Theme file
- Open your Shopify backend
- Navigate to: 1: Sales Channels → 2: Online Store → 3: Edit code (in active theme)
- Look for the relevant file, and the specific location in the file, where the widget needs to be shown (Make sure to find the correct file and location that represents the desired location. In case of doubt, reach out to your developer or the creator of the theme)
- Copy the following eTrusted widget code below (Make sure that you provide your personal YOUR_WIDGET_ID): Each widget has its own widget ID. You can find your widget's ID in your eTrusted Control Center under:
Reviews → Marketing → Widgets
eTrusted Widget Code
<!-- Begin eTrusted widget integration MANUAL -->
{% assign ts_widget_product = blank %}
{% if card_product != blank and card_product.variants != blank %}
  {% assign ts_widget_product = card_product %}
{% elsif product_card_product != blank and product_card_product.variants != blank %}
  {% assign ts_widget_product = product_card_product %}
{% elsif product != blank and product.variants != blank %}
  {% assign ts_widget_product = product %}
{% elsif current_variant != blank and current_variant.product != blank and current_variant.product.variants != blank %}
  {% assign ts_widget_product = current_variant.product %}
{% elsif product_variant != blank and product_variant.product != blank and product_variant.product.variants != blank %}
  {% assign ts_widget_product = product_variant.product %}
{% endif %}
{% assign ts_product_identifiers = '' %}
{% assign ts_seen_identifiers = '|' %}
{% if ts_widget_product != blank %}
  {% for variant in ts_widget_product.variants %}
    {% assign ts_variant_identifier = variant.sku | strip %}
    {% if ts_variant_identifier == blank %}
      {% assign ts_variant_identifier = variant.id %}
    {% endif %}
    {% capture ts_seen_token %}|{{ ts_variant_identifier }}|{% endcapture %}
    {% unless ts_seen_identifiers contains ts_seen_token %}
      {% capture ts_seen_identifiers %}{{ ts_seen_identifiers }}{{ ts_variant_identifier }}|{% endcapture %}
      {% if ts_product_identifiers != blank %}
        {% capture ts_product_identifiers %}{{ ts_product_identifiers }},{{ ts_variant_identifier }}{% endcapture %}
      {% else %}
        {% assign ts_product_identifiers = ts_variant_identifier %}
      {% endif %}
    {% endunless %}
  {% endfor %}
{% endif %}
<etrusted-widget data-etrusted-widget-id="YOUR_WIDGET_ID" data-sku="{{ ts_product_identifiers }}"></etrusted-widget>
<!-- End eTrusted widget integration -->
- And paste this at the desired location in the relevant file and location of your theme and click Save
Now the widget should be showing on your page.
2.3.2 Integrating the Product Review Mini Stars widget (Widget extensions)
The widget anchor appears under the product name as the Mini Stars and allows users to scroll down automatically to the main Full Review List widget.
Make sure that the Full Review List widget is active and showing on the same page as the extension!
2.3.2.1 Integrating the Product Review Mini Stars widget (Widget extensions) - in Theme Editor
- Open your Shopify backend
- Navigate to: 1: Sales Channels → 2: Online Store → 3: Edit Theme (in active theme)
This will open the theme editor and look for the desired location of the widget.
- Create a new section Custom Liquid at the desired location of your page
- Copy the following eTrusted widget code below:
eTrusted Widget Code
<!-- Begin eTrusted product-star tag MANUAL -->
<etrusted-product-review-list-widget-product-star-extension></etrusted-product-review-list-widget-product-star-extension>
<!-- End eTrusted product-star tag -->
- And paste this code in the Custom Liquid textbox and click Save
Now the widget should be showing on your page.
2.3.2.2 Integrating the Product Review Mini Stars widget (Widget extensions) - in Theme File
- Open your Shopify backend
- Navigate to: 1: Sales Channels → 2: Online Store → 3: Edit code (in active theme)
- Look for the relevant file, and the specific location in the file, where the widget needs to be shown (Make sure to find the correct file and location that represents the desired location. In case of doubt, reach out to your developer or the creator of the theme)
- Copy the following eTrusted widget code below:
eTrusted Widget Code
<!-- Begin eTrusted product-star tag MANUAL -->
<etrusted-product-review-list-widget-product-star-extension></etrusted-product-review-list-widget-product-star-extension>
<!-- End eTrusted product-star tag -->
- And paste this at the desired location in the relevant file and location of your theme and click Save
Now the widget should be showing on your page.
Updated about 2 months ago